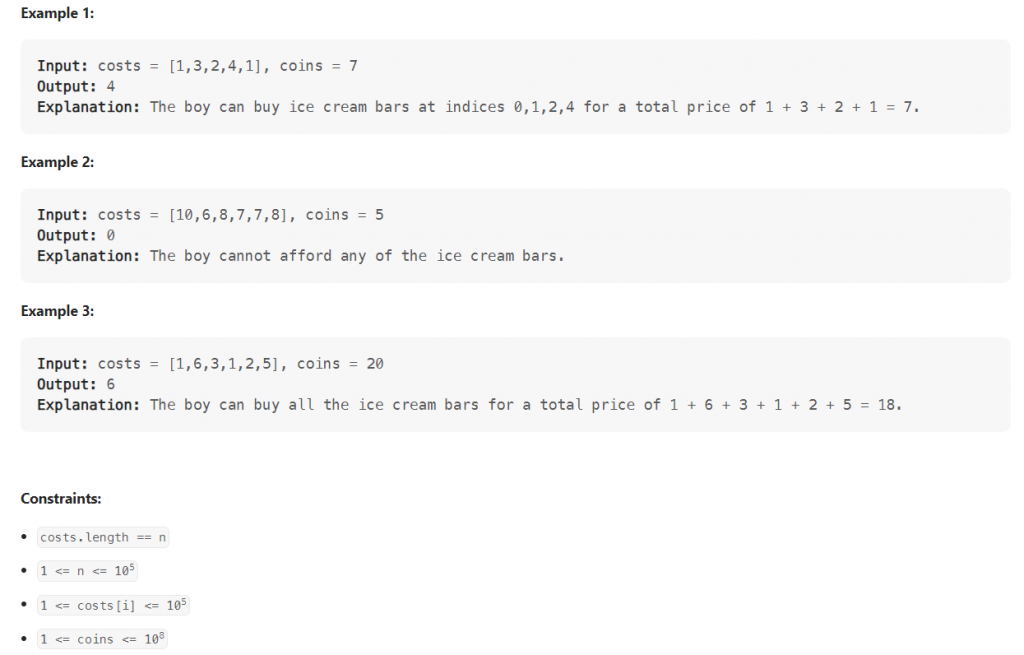
It is a sweltering summer day, and a boy wants to buy some ice cream bars.
At the store, there are n ice cream bars. You are given an array costs of length n, where costs[i] is the price of the ith ice cream bar in coins. The boy initially has coins coins to spend, and he wants to buy as many ice cream bars as possible.
Return the maximum number of ice cream bars the boy can buy with coins coins.
Note: The boy can buy the ice cream bars in any order.
class Solution {
    public int maxIceCream(int[] costs, int coins) {
        int count = 0;
        Arrays.sort(costs);
        for(int i=0;i<costs.length;i++) {
        	if(costs[i]<=coins) {
        		count++;
        		coins -= costs[i];
        	}else{
                return count;
            }
        }
        return count;
    }
}
There are a few options that you could consider to provide adequate protection against accidental deletion of objects in Amazon S3:
Use versioning: You can enable versioning for your Amazon S3 bucket, which keeps track of all versions of your objects (including all deletions). This way, if an object is accidentally deleted, you can recover it by restoring the deleted version.
Use object locking: You can enable object locking for your Amazon S3 bucket, which allows you to lock objects so that they cannot be deleted or overwritten for a specified period of time. This can help prevent accidental deletion of objects.
Use cross-region replication: You can set up cross-region replication for your Amazon S3 bucket, which replicates objects to a destination bucket in a different region. This can provide an additional layer of protection against data loss due to accidental deletion or other issues in the primary region.
Use Lifecycle policies: You can use Lifecycle policies to automate the transition of objects to different storage classes or to delete objects that are no longer needed. This can help reduce the risk of accidental deletion by ensuring that objects are only retained for as long as they are needed.
Here are a few tips for studying for the AWS Certified Solutions Architect Associate exam:
Review the exam blueprint: The exam blueprint is a detailed outline of the topics and concepts that will be covered on the exam. Reviewing the blueprint can help you focus your studies and ensure that you are thoroughly prepared for the exam.
Use AWS documentation and whitepapers: AWS provides a wealth of documentation and whitepapers that can be helpful for studying for the exam. Make sure to read through these materials and become familiar with the various services and technologies that are covered on the exam.
Take practice exams: There are many practice exams available that can help you prepare for the AWS Certified Solutions Architect Associate exam. These exams can help you get a feel for the types of questions that will be on the exam, as well as identify areas where you may need to focus your studies.
Use online resources: There are many online resources available, such as blogs, forums, and online courses, that can be helpful for studying for the AWS Certified Solutions Architect Associate exam. These resources can provide additional information and guidance to help you prepare.
Attend training courses: AWS offers a range of training courses that can be helpful for studying for the AWS Certified Solutions Architect Associate exam. These courses can provide hands-on experience with the technologies covered on the exam and help you build a solid foundation of knowledge.
Here are a few best practices to follow when reviewing Appian code:
Use a code review tool: A code review tool can help you automate some of the review process, such as checking for coding standards or identifying potential issues. This can save time and help ensure that you don’t miss anything important.
Follow established coding standards: Make sure that the code being reviewed follows established coding standards, such as those outlined in the Appian Code Review Best Practices guide. This will help ensure that the code is easy to read and maintain.
Look for potential issues: Check for potential issues such as security vulnerabilities, performance issues, or bugs. If you find any issues, make sure to document them clearly and provide recommendations for how to address them.
Consider maintainability: Consider the maintainability of the code being reviewed. Is it easy to read and understand? Is it well-documented? Are there any areas where the code could be refactored to make it more maintainable?
Provide constructive feedback: Provide constructive feedback to the developer who wrote the code. Be specific about what you liked and what you would like to see improved, and provide suggestions for how to address any issues you have identified.
It is understandable that the process of conducting a performance self-review as a software engineer can be challenging and time-consuming. However, it is an important aspect of professional development and can provide valuable insights into areas where you may be excelling and areas where you may have room for improvement.
One way to approach this task is to focus on your accomplishments and contributions over the past year. This can include specific projects or tasks that you have completed, as well as more general achievements such as learning new skills or technologies.
It can also be helpful to consider feedback you have received from colleagues or supervisors, and to reflect on how you have applied this feedback to your work. This can provide a more holistic view of your performance and can help you identify areas where you may need to focus your efforts.
Overall, while it may not be the most enjoyable task, taking the time to conduct a performance self-review can be a valuable opportunity for personal and professional growth.
Here are some tips for writing a performance self-review as a software engineer:
Identify your accomplishments and contributions: Start by listing out your accomplishments and contributions over the past year. This can include specific projects or tasks you have completed, as well as more general achievements such as learning new skills or technologies.
Reflect on feedback: Consider feedback you have received from colleagues or supervisors, and reflect on how you have applied this feedback to your work. This can provide valuable insights into your strengths and areas for improvement.
Set goals for the future: Use your self-review as an opportunity to set goals for the future. This can include specific goals related to your work as a software engineer, as well as more general goals related to your personal and professional development.
Be honest and objective: Be honest and objective in your self-review. It’s important to be realistic about your strengths and areas for improvement, and to avoid overstating your accomplishments or downplaying your challenges.
Seek feedback from others: Consider seeking feedback from others, such as colleagues or supervisors, to help you get a more well-rounded view of your performance. This can be especially helpful if you have trouble coming up with a complete list of your accomplishments or if you struggle with self-assessment.
Here are a few tips for how to ask someone to review your work:
Be specific about what you would like reviewed: It’s important to be clear about what you are asking the person to review. This might include a specific document, codebase, or other piece of work.
Provide context: It can be helpful to provide some context or background information about the work you are asking the person to review. This can help them understand your objectives and the purpose of the work.
Set a timeline: If you have a deadline for when you would like the review to be completed, it’s important to communicate that to the person you are asking. This can help them prioritize the review and ensure that they are able to meet your timeline.
Be polite and respectful: It’s important to remember that the person you are asking to review your work is doing you a favor, so be sure to thank them in advance and be respectful of their time.
Offer to return the favor: If you would like to ask someone to review your work, it can be helpful to offer to review their work in return. This can create a sense of reciprocity and make the request more palatable for the other person.
This lab demonstrates how to use AWS DataSync and an AWS Storage Gateway file gateway to migrate data from an on-premises Network File System (NFS) server to Amazon Simple Storage Service (Amazon S3).
After completing this lab, you will be able to :
Deploy and activate a DataSync agent as an Amazon Elastic Compute Cloud (Amazon ECS) instance
Create a DataSync task to copy data from a Linux-based NFS server to an S3 bucket
Deploy and activate a Storage Gateway file gateway appliance as an EC2 instance
Create an NFS file share on a file gateway
Configure a Linux host to connect to an NFS share on a file gateway
Task 1 : Connect to the On-Premises NFS Server
To mount the on-premise NFS share to the client instance, run the following command.
Replace <NfsServerPrivateIp> with the actual NfsServerPrivateIp
sudo mount <NfsServerPrivateIp>:/var/nfs /mnt/nfs
sudo mount 10.10.2.132:/var/nfs /mnt/nfs
To verify that the NFS file share was mounted successfully, run the following command :
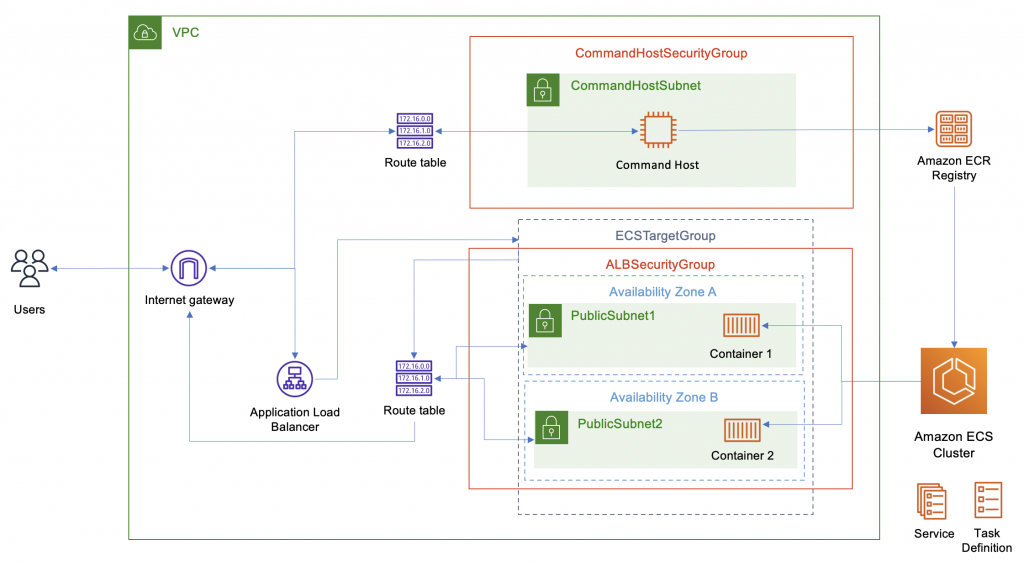
Deploy a web-based application as a Docker container image. After verifying that the image is successfully created, push it to Amazon Elastic Container Registry (Amazon ECR). Then, launch an Amazon Elastic Container Service (Amazon ECS) cluster and create an AWS Fargate profile. Finally, deploy the application to a Fargate cluster.
docker -v && git --version

Docker version 20.10.13, build a224086
git version 2.37.1
pwd

/home/ssm-user
# or
/usr/bin
cd ~
git clone https://github.com/gabrielecirulli/2048
ls -l | grep 2048

drwxr-xr-x 6 ssm-user ssm-user 200 Jul 22 23:57 2048
Task 2 : Containerize the Application
cd 2048
vim Dockerfile
FROM nginx:latest

COPY . /usr/share/nginx/html

EXPOSE 80
docker images

REPOSITORY   TAG       IMAGE ID       CREATED          SIZE
web2048      latest    7de26addeed8   24 minutes ago   143MB
nginx        latest    670dcc86b69d   3 days ago       142MB
docker run -d -it -p 80:80 web2048
history | grep container
ctrl + r

(reverse-i-search)`container': docker container ls

# press enter and the "list containers" command runs again.

[ssm-user@ip-10-0-0-55 2048]$ docker container ls
CONTAINER ID   IMAGE     COMMAND                  CREATED         STATUS         PORTS                               NAMES
0e5c8fe77af7   web2048   "/docker-entrypoint.…"   4 minutes ago   Up 4 minutes   0.0.0.0:80->80/tcp, :::80->80/tcp   elated_boyd


docker container ls

curl http://169.254.169.254/latest/meta-data/public-ipv4 -w "\n"

docker stop CONTAINER ID
Task 4 : Create an Amazon ECR Repository and Push the Docker Image
docker images

REPOSITORY   TAG       IMAGE ID       CREATED       SIZE
web2048      latest    df0b3b5dd073   2 hours ago   143MB
nginx        latest    670dcc86b69d   3 days ago    142MB
aws configure


AWS Access Key ID [None]:
AWS Secret Access Key [None]:
Default region name []: <YOUR_REGION>
Default output format [json]: json
export ACCOUNT_ID=$(aws sts get-caller-identity --output text --query Account)

export AWS_REGION=$(curl -s 169.254.169.254/latest/dynamic/instance-identity/document | jq -r '.region')

aws ecr get-login-password --region ${AWS_REGION} | docker login --username AWS --password-stdin ${ACCOUNT_ID}.dkr.ecr.${AWS_REGION}.amazonaws.com

WARNING! Your password will be stored unencrypted in /root/.docker/config.json.
Configure a credential helper to remove this warning. See
https://docs.docker.com/engine/reference/commandline/login/#credentials-store

Login Succeeded
docker tag web2048:latest ${REPOSITORY_URI}:latest
docker images

REPOSITORY                                             TAG       IMAGE ID       CREATED         SIZE
 294373654843.dkr.ecr.us-east-1.amazonaws.com/web2048   latest    07a9581ba9e6   6 minutes ago   143MB
 web2048                                                latest    07a9581ba9e6   6 minutes ago   143MB
 nginx                                                  latest    670dcc86b69d   5 days ago      142MB