import random


def choose_word():
    word_list = [
        "apple",
        "banana",
        "cherry",
        "dog",
        "elephant",
        "flower",
        "grape",
        "house",
        "icecream",
        "jungle",
    ]
    return random.choice(word_list)


def display_word(word, guessed_letters):
    display = ""
    for letter in word:
        if letter in guessed_letters:
            display += letter
        else:
            display += "_"
    return display


def hangman():
    word = choose_word()
    guessed_letters = []
    attempts = 6

    print("Welcome to Hangman!")

    while True:
        print("\n" + display_word(word, guessed_letters))
        guess = input("Guess a letter: ").lower()

        if guess in guessed_letters:
            print("You've already guessed that letter.")
            continue

        guessed_letters.append(guess)

        if guess not in word:
            attempts -= 1
            print(f"Wrong guess! You have {attempts} attempts left.")

            if attempts == 0:
                print(f"Sorry, you're out of attempts! The word was '{word}'.")
                break
        else:
            if all(letter in guessed_letters for letter in word):
                print(f"Congratulations! You guessed the word '{word}'!")
                break


hangman()
Author: fire_horse
-
Building a Hangman Game in Python
-
Automating Form Submission with Playwright and TypeScript
In this tutorial, we’ll continue our exploration of Playwright and TypeScript by automating the process of filling out and submitting a form on a website. This example will demonstrate how to interact with input fields, checkboxes, and buttons.
Prerequisites
Before you begin, make sure you have completed the initial setup outlined in the previous blog post.
Getting Started
1. Writing the Script
Create a new TypeScript file in your project directory, such as
form_submission.ts. Open the file in your code editor and paste the following code:import { chromium, Browser, Page } from 'playwright'; (async () => { // Launch the browser const browser: Browser = await chromium.launch(); // Create a new browser context const context = await browser.newContext(); // Create a new page const page: Page = await context.newPage(); // Navigate to the form page await page.goto('https://www.example-form.com'); // Fill out the form await page.fill('#name', 'John Doe'); await page.check('#subscribe'); await page.selectOption('#gender', 'male'); // Submit the form await page.click('#submit-button'); // Wait for the form submission to complete await page.waitForSelector('#success-message'); // Capture a screenshot of the success message await page.screenshot({ path: 'form_submission.png' }); // Close the browser await browser.close(); })();2. Compiling and Running the Script
Compile the TypeScript code into JavaScript using the TypeScript compiler:
tsc form_submission.tsThen, run the compiled script with Node.js:
node form_submission.jsThe script will navigate to a form page, fill out the form with sample data, submit it, wait for the success message to appear, and capture a screenshot of the success message.
Customization
You can customize the script to interact with different types of form elements, handle error scenarios, or automate other interactions on web pages.
Conclusion
In this example, we demonstrated how Playwright and TypeScript can be used to automate the process of filling out and submitting a form on a website. This combination of technologies enables developers to efficiently automate various web interactions and streamline testing processes.
Feel free to build upon this example and explore Playwright’s extensive documentation to discover more features and use cases.
Happy automating!
Feel free to adjust the example and the explanation according to your preferences. This example showcases how to interact with form elements and perform actions like filling out fields, checking checkboxes, selecting options from dropdowns, and capturing screenshots of success messages.
-
Automating Browser Tasks with Playwright and TypeScript
When it comes to automating browser tasks and interactions, Playwright has emerged as a powerful tool in the developer’s toolkit. In this tutorial, we’ll explore how to use Playwright with TypeScript to automate tasks like navigating to websites and capturing screenshots.
Prerequisites
Before we begin, make sure you have the following installed on your system:
- Node.js (which includes npm, the Node Package Manager)
- TypeScript (install globally using
npm install -g typescript)
Getting Started
1. Project Setup
Create a new directory for your project and navigate to it using your terminal or command prompt.
mkdir playwright-tutorial
cd playwright-tutorial
2. Installing Playwright
In the project directory, install the Playwright library using npm:
npm install playwrightThis will install the Playwright library along with its dependencies.
3. Writing the Script
Create a TypeScript file in the project directory. You can name it
playwright_script.ts. Open this file in your favorite code editor and paste the following code:import { chromium, Browser, Page } from 'playwright'; (async () => { // Launch the browser const browser: Browser = await chromium.launch(); // Create a new browser context const context = await browser.newContext(); // Create a new page const page: Page = await context.newPage(); // Navigate to a website await page.goto('https://www.example.com'); // Take a screenshot await page.screenshot({ path: 'screenshot.png' }); // Close the browser await browser.close(); })();4. Compiling and Running the Script
To compile the TypeScript code into JavaScript, run the following command in the terminal:
tsc playwright_script.tsThis will generate a
playwright_script.jsfile in the same directory.Now, run the compiled script using Node.js:
node playwright_script.jsAfter running the script, you should see a new screenshot file named
screenshot.pngin your project directory. This screenshot captures the webpage you navigated to.Customization
Feel free to customize the script to suit your needs. You can change the URL to any website you want to automate, modify interaction steps, or capture additional data using Playwright’s rich API.
Conclusion
With Playwright and TypeScript, automating browser tasks becomes efficient and enjoyable. The combination of Playwright’s powerful capabilities and TypeScript’s static typing makes for robust and maintainable browser automation scripts.
Now that you’ve learned the basics, explore Playwright’s documentation to discover more advanced features and possibilities for automating web interactions.
Happy scripting!
-
Exploring the Inner Workings of SFTP: Secure File Transfer Simplified
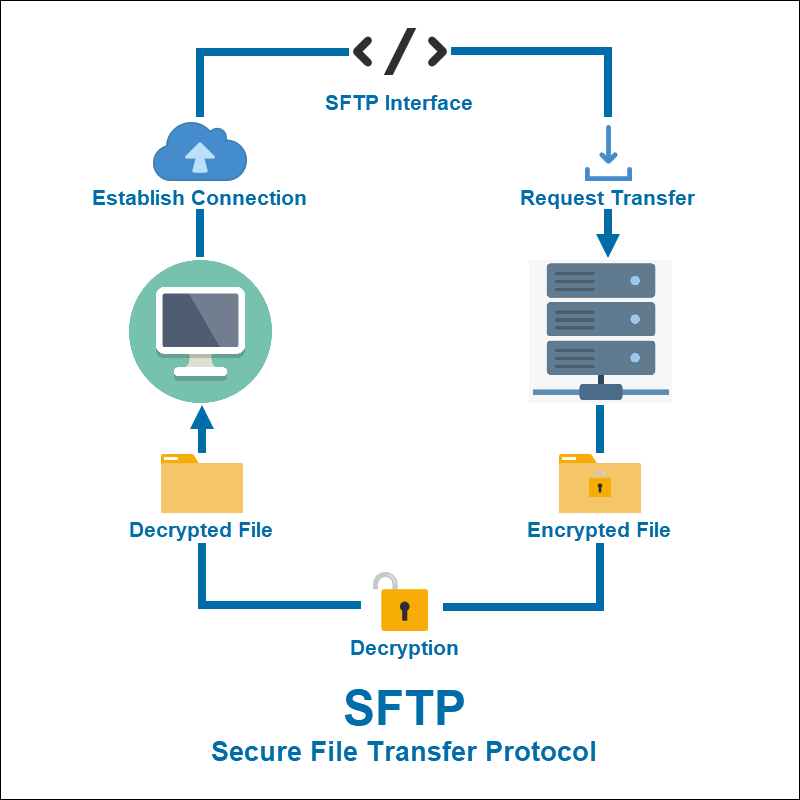
In today’s interconnected digital world, the need to transfer files securely and efficiently is more critical than ever. Enter SFTP, the Secure File Transfer Protocol, a robust solution designed to ensure your data’s safety while seamlessly ferrying files across networks. In this blog, we’ll dive into the inner workings of SFTP, demystifying the process that keeps your files protected as they traverse the digital realm.
The Foundation: Authentication and Encryption
At the heart of SFTP lies a strong emphasis on security. When initiating a connection, the SFTP client – be it a user or a program – presents its credentials to the server. This authentication process can involve traditional username and password combinations or the more secure method of public key authentication. Once the server verifies the client’s identity, a secure channel is established, often through the implementation of SSH (Secure Shell) protocols like SSH-2.
Channeling Communication: Command and Data Channels
SFTP communication operates through two distinct channels – the command channel and the data channel – each serving a specific purpose. The command channel facilitates the exchange of SFTP commands, such as requests to list directories, download files, or perform other file operations. On the other hand, the data channel comes into play when actual file data needs to be transferred.
The Dance of Commands and Responses
The beauty of SFTP lies in its simplicity of commands and responses. The client sends various SFTP commands across the command channel, each one tailored to a specific operation. These operations can range from navigating directories to fetching file information or transferring files themselves. In response, the server communicates using suitable status codes and data to keep the client informed about the operation’s progress.
Secure Data Transfer: The Heart of SFTP
When it’s time to transfer files, SFTP doesn’t compromise on security. The client and server collaboratively decide on a secure data channel through which the actual file content is transmitted. This data is encrypted, ensuring that its confidentiality remains intact throughout the journey. To send a file to the server, the client issues an “upload” request, while a “download” request is used to retrieve a file from the server.
Building Blocks: Packet Format and Integrity
SFTP operates on a foundation of packets – units of data that encapsulate the essence of the protocol. These packets come loaded with vital information such as the type of operation, the length of data, and, of course, the actual data itself. However, SFTP doesn’t stop at merely transmitting data; it employs ingenious mechanisms to guarantee data integrity and flag any errors that might occur during transmission.
Graceful Farewell: Closing the Connection
As the file transfer operations conclude, the client can gracefully terminate the SFTP session by sending a “close” command. This step effectively winds down the connection and ensures that both parties can resume their tasks without any lingering overhead.
In the grand tapestry of secure data transmission, SFTP emerges as a star player, ensuring the safe passage of files across networks. With its emphasis on authentication, encryption, and secure channels, it stands as a testament to the power of technology in safeguarding our digital interactions. So, the next time you transfer files, remember that beneath the surface, SFTP is orchestrating a symphony of security to keep your data harmoniously intact.
-
A simple “Hello World” example in Ruby on Rails
Sure, here’s a simple “Hello World” example in Ruby on Rails:
- Create a New Rails Application: Open your terminal and navigate to the directory where you want to create your Rails application. Run the following command to create a new Rails app named “hello_world_app”:
rails new hello_world_app- Navigate to the App Directory: Move into the newly created app directory:
cd hello_world_app- Generate a Controller and View:
- Generate a controller named “welcome” with an action called “index”:
rails generate controller welcome index- Edit the View:
- Open the file located at
app/views/welcome/index.html.erbusing a text editor, and replace the content with:
<!DOCTYPE html> <html> <head> <title>Hello World</title> </head> <body> <h1>Hello, Rails!</h1> <p>Welcome to the world of Ruby on Rails.</p> </body> </html>- Start the Server:
- Run the Rails development server using the following command:
rails server- View the Hello World Page:
- Open your web browser and go to
http://localhost:3000. You should see the “Hello, Rails!” message displayed on the page.
Congratulations! You’ve successfully created a “Hello World” example using Ruby on Rails. This is a very basic example, but it gives you a taste of how controllers, views, and routes work together in a Rails application. From here, you can explore more advanced features and build more complex applications.
-
Getting Started with Ruby on Rails: Building Web Apps Seamlessly
Title: Getting Started with Ruby on Rails: Building Web Apps Seamlessly
Are you looking to dive into web development and create dynamic, feature-rich applications? Look no further than Ruby on Rails. Also known simply as Rails, this open-source framework has been a favorite among developers for its elegant and efficient approach to building web applications. In this blog post, we’ll introduce you to the world of Ruby on Rails and help you get started on your coding journey.
What is Ruby on Rails?
Ruby on Rails, often referred to as Rails, is a full-stack web development framework written in the Ruby programming language. It follows the Model-View-Controller (MVC) architectural pattern, which promotes the separation of concerns within your application. This separation makes your codebase more organized, maintainable, and scalable.
Why Choose Ruby on Rails?
- Developer Happiness: Rails emphasizes convention over configuration, which means it provides sensible defaults and conventions for various aspects of your application. This streamlines the development process and allows you to focus on writing code rather than spending time on configuration.
- Rapid Development: Rails’ code generation tools, automated testing framework, and built-in libraries enable developers to create applications faster without sacrificing code quality. This is especially useful when you need to prototype or iterate on your ideas quickly.
- Strong Community and Resources: With a vibrant community and extensive documentation, you’ll never feel stranded when using Rails. You can find tutorials, guides, and plugins to extend the functionality of your application.
Setting Up Your Development Environment
Before you start coding, you’ll need to set up your development environment:
- Install Ruby: Rails is built on the Ruby programming language. Install Ruby on your system using version management tools like RVM or rbenv to manage different Ruby versions.
- Install Rails Gem: Once you have Ruby installed, you can install Rails using the gem package manager by running
gem install rails. - Database Setup: Rails supports various databases, but SQLite is often used for development. Configure your database settings in the
config/database.ymlfile. - Create Your First App: Use the command
rails new your_app_nameto create a new Rails application. This will set up the basic structure for your project.
Building Your First Rails App
Let’s create a simple “Hello World” application to get you started:
- Generate a Controller: Run
rails generate controller Welcometo create a new controller named “Welcome”. - Define a Route: In the
config/routes.rbfile, add a route that maps the root URL to the “welcome#index” action. - Create a View: In the
app/views/welcomedirectory, create a file namedindex.html.erband add your “Hello World” message. - Start the Server: Launch the development server by running
rails server. You can access your app in a web browser athttp://localhost:3000.
Congratulations! You’ve just created your first Ruby on Rails application.
Learning Resources and Further Steps
As you delve deeper into Ruby on Rails, you’ll encounter concepts like migrations, models, views, controllers, and more. There are plenty of resources available to help you learn:
- Official Rails Guides: The Ruby on Rails Guides provide comprehensive documentation on various aspects of the framework.
- Online Tutorials: Websites like Codecademy and RailsTutorial offer interactive tutorials to guide you through building real-world applications.
- Books: Books like “Agile Web Development with Rails” by Sam Ruby, David B. Copeland, and Dave Thomas are excellent references for mastering Rails.
Wrapping Up
Ruby on Rails empowers developers to build sophisticated web applications efficiently and with joy. Its elegant design, focus on convention, and vast community support make it an excellent choice for both beginners and experienced developers. So, whether you’re creating a simple blog or a complex e-commerce platform, Ruby on Rails has got you covered. Happy coding!
-
Building a Simple React App
https://github.com/jonasschmedtmann/ultimate-react-course
Open up a new react sandbox using following command :
In a new browser tab type the following :
react.new
import { useEffect, useState } from "react";

export default function App() {
  const [advice, setAdvice] = useState("");
  const [count, setCount] = useState(0);

  async function getAdvice() {
    const res = await fetch("https://api.adviceslip.com/advice");
    const data = await res.json();
    setAdvice(data.slip.advice);
    setCount((c) => c + 1);
  }

  useEffect(function () {
    getAdvice();
  }, []);

  return (
    <div>
      <h1>{advice}</h1>
      <button onClick={getAdvice}>Get advice</button>
      <Message count={count} />
    </div>
  );
}

function Message(props) {
  return (
    <p>
      You have read <strong>{props.count}</strong> pieces of advice
    </p>
  );
}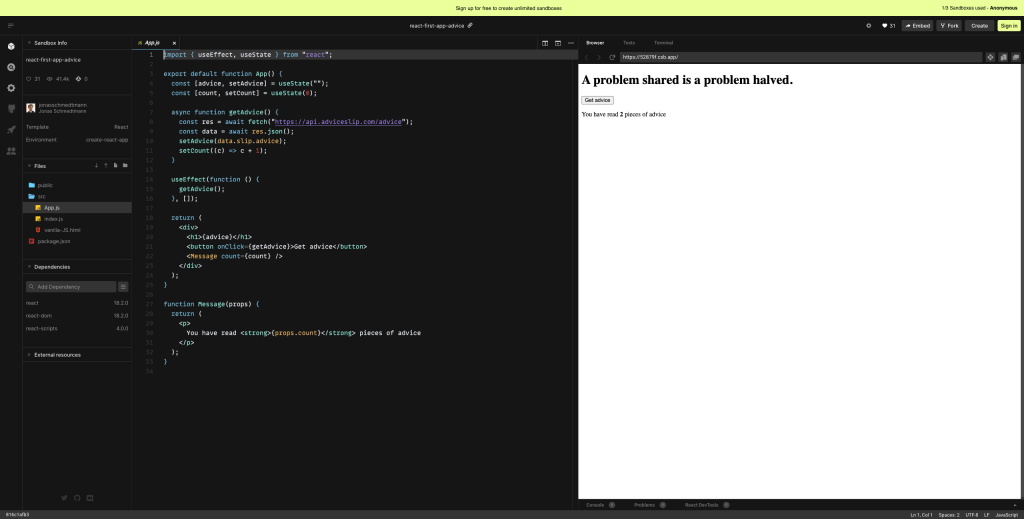
-
Enhancing Monitoring for E-Commerce Success: Three Steps to Troubleshoot Traffic Spikes
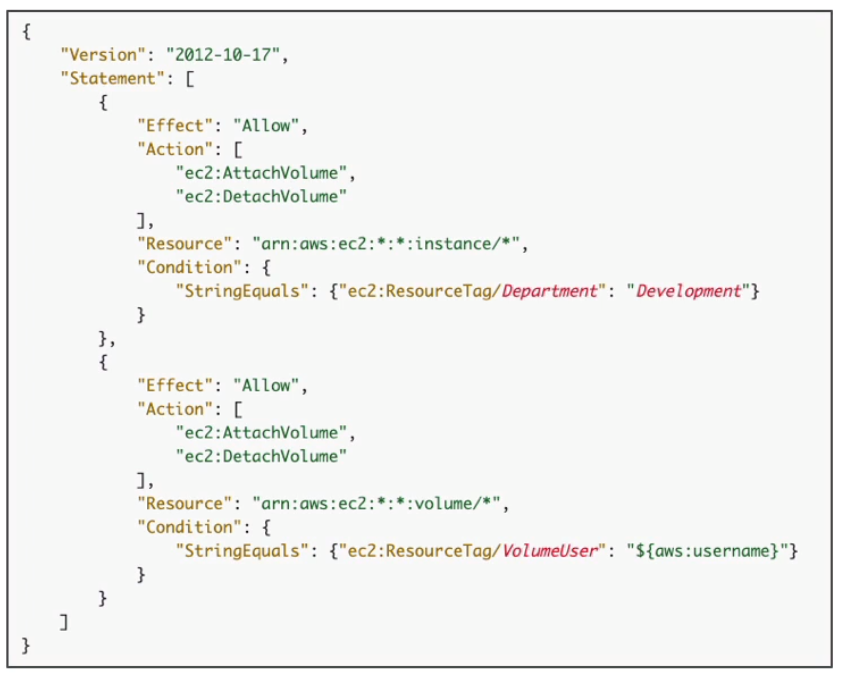
An e-commerce company manages its flagship application on a load-balanced EC2 instance fleet for web hosting, database API services, and business logic. This tightly coupled architecture makes it inflexible for new feature additions while also making the architecture less scalable.
Which of the following options can be used to decouple the architecture, improve scalability and provide the ability to track the failed orders?
- Set up the AWS X-Ray SDK to trace incoming HTTP requests on the EC2 instances as well as set up tracing of SQL queries with the X-Ray SDK for Java
- Install and configure an Amazon CloudWatch Logs agent on the EC2 instances to send the application logs to CloudWatch Logs
- Configure the Aurora MySQL DB cluster to publish slow query and error logs to Amazon CloudWatch Logs

To make the monitoring process more reliable for troubleshooting future events due to traffic spikes, I would recommend the following steps:
- Implement centralized log management: Set up a centralized log management system that collects logs from all web servers and stores them in a central location. This ensures that even if individual web servers are terminated, their logs are still available for analysis. Tools like ELK Stack (Elasticsearch, Logstash, and Kibana) or Splunk can be used for centralized log management.
- Enable comprehensive application logging: Ensure that the web application is configured to log detailed information about errors and exceptions. This includes logging stack traces, error messages, request/response details, and any relevant contextual information. Having comprehensive logs will help in understanding the root cause of errors during traffic spikes.
- Set up robust database monitoring: Improve the monitoring of the Aurora DB cluster by configuring and collecting relevant metrics. This can include monitoring key performance indicators such as CPU utilization, memory usage, disk I/O, query execution times, and connection pool statistics. Use database monitoring tools or services provided by your cloud provider to gain insights into the performance of the database during high traffic periods.
- Implement real-time monitoring and alerting: Set up real-time monitoring and alerting mechanisms to proactively identify issues during traffic spikes. This can involve using tools like Amazon CloudWatch or third-party monitoring services that allow you to define custom metrics, set thresholds, and receive alerts when certain conditions are met. By monitoring critical metrics in real-time, you can quickly identify and troubleshoot issues as they arise.
- Perform load testing and capacity planning: Conduct load testing exercises to simulate high traffic scenarios and identify any potential bottlenecks or performance issues in the application infrastructure. This will help you understand the system’s capacity limits and enable you to plan for adequate resources during peak traffic periods, such as the Thanksgiving sale. Regularly review and update your capacity planning based on traffic trends and business growth.
By implementing these steps, you can establish a more reliable monitoring process that captures and retains crucial data, enables better troubleshooting, and helps you proactively respond to and mitigate issues during traffic spikes.